Showing posts with label Puppy Nursery. Show all posts

Friday, July 31, 2009

Mod Podge Mania Time!

Yay! It's Mod Podge Mania time again :-D I love that Xazmin hosts this every month because it inspires me to keep going with my Mod Podge and challenges me to be creative.

For today, I revamped a night stand for my son's puppy nursery. Here's the B&A:


The scrapbooking paper I had on hand from a package I picked up at Goodwill. The little wooden puppy came from Michael's and cost less than a dollar even though he came already painted and everything. Cute, huh?!
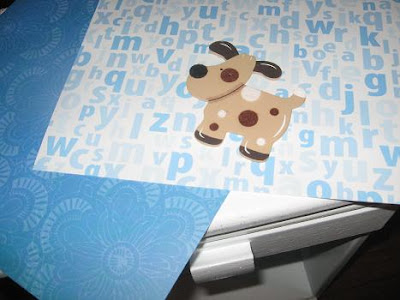

I'm really happy with the way it turned out!


I didn't repaint the outside because I like the light blue color, but I did paint the inside of the drawer:


I Mod Podged both the table top and the bottom of the drawer. I love attention to detail! I think the pop of color and whimsy when you open the drawer is a pleasant surprise! I like when the inside of drawers are painted colors! And the best part is you can be really bold with your color choice because it's not seen the majority of the time :-)

To attach the puppy on drawer, I just removed one of his felt spots, nailed him on, and then glued the spot back where it came from. Probably not the best way to do it, but it certainly worked. I also used a little wood glue:


If you have any trouble with a drawer sticking after you paint it, you can just run a bar of soap along the sides and it will start to slide easy peasy ;-)


Can't wait to see every one's projects for today! If you want to see more Mod Podge projects too, head over to Xazmin's! :-)

Friday, April 24, 2009

Super Puppy Nursery Inspiration

You know me, I gotta do everything myself, so here's some projects I did for my son's puppy nursery!

I got these letters at Wal-mart for just a few dollars a piece. I painted them to match the puppies from the sleeper, and added the ribbon myself. I wanted to spell my son's name, but at the time I was still pregnant and we hadn't picked his name yet. So I went with the "Woof" instead.


It hangs above his crib :-)


These little guys are my favorite. I found these tiny canvases in the dollar section at Joe-Ann's fabric store. They were supposed to be a paint-it-yourself thing. I think they had pictures of fruit on them. So I just painted them solid colors with white polka dots around the outside to act as a "frame". I cut out the puppy shapes from felt (leftover from my puppy music box transformation) and glued them to the canvases with regular school glue. Then, I dotted their eyes with black fabric paint. I love how they turned out!


Where did I get my inspiration? From the puppies on this sleeper, or course! Even us supers have to get inspiration from somewhere you know! ;-)


The cost of the "Woof" was around $12 for the letters. Because I used paint and felt I already had, the cost of the puppy pictures was just the $3 I spent on the canvases.

Look for inspiration everywhere! My puppy nursery ideas were right under my nose!

*Updated to Say* This is an oldie, but a goodie. So I'm posting it on Kimba's DIY Party today ;-)

Monday, February 9, 2009

Once Upon a Time there was a Hippo... but not anymore!

Once upon a time, The Masked Mommy was shopping at a *Goodwill Clearance center (see bottom of post). The items at these Goodwills are generally sold for $1/pound. She found an adorable hippo music box, and couldn't leave it behind given that it was so lightweight and therefore really really cheap.

After she got him home, she couldn't help but wish he had been a puppy so that he would match The Masked Baby's room. She thought there was no hope the music box would ever fit in among the child's other belongings. Then, her superpower for repurposing things called out from within her... "maybe there's a way..."


She was right!
There was much rejoicing, and everyone within the
kingdom of the child's room lived happily ever after!


Ok. So here's how it went down. First, I removed his blue "hippo toes" with a seam ripper. Then, I cut out puppy ears with some brown felt, folded it over his hippo ears, and stitched them on by hand. Then I cut out an oval for his nose, sewed it almost all the way around, shoved some stuffing in, and finished sewing it closed. (I think this technique has a name, but I don't know what it is.)

That's when his little pink hippo nostrils became a problem. What to do with them? So I decided they were dimples, and I drew his mouth on with some black fabric paint (meeting up with the "dimples".)

The paw prints were just cut out of felt and hand sewn on. They were the most time consuming part, but I think they make him really cute! Felt is great because raw edges are fine... so there's nothing to sew under! The whole project took just the afternoon (plus paint drying time).


It's cute on his crib and matches the room!

Although I will admit that I'm not sure he's baby safe, so I hung him on the outside of the crib.


The Moral of this story... Don't give up on what you have around the house! Get those creative juices flowing! Repourposing things is one of my favorite things to do. I know none of you have a toy hippo around the house that needs to be turned into a puppy, but I think seeing what others have done helps to inspire your own creative ideas for your own individual needs!

*Goodwill Clearance Centers- (sometimes called Goodwill Outlets) Yes, they sell their clothes and things REALLY cheap. I used to shop at one in Charlotte NC for $1.30/pound, and one in Columbia SC for $1/pound. This makes children clothing items roughly .25/item. Last winter, I outfitted our daughter for the entire summer for $14. Shoes and everything. As far as I can tell, there's no online list of all the clearance centers, so you'll have to do your own research to find one in your area. I found this website with some in Indiana (and it has a picture of what to expect). Happy hunting!

Thursday, January 1, 2009

Super Posts... At Least They're My Favorite :-)

If you're new to The Masked Mommy, welcome! When I'm not too busy saving the world, or leaping buildings with a single bound, I blog! Please take a look around, and I hope you like what you see! You can leave me feedback or suggestions in the comments, or email me at maskedmommy@gmail.com

Now for the Super Posts!

I can teach you how to make your own mail sorter using things you already have around your house! You can do it!


Check out these thrifty toy storage ideas.


I've done tons of diy projects for my son's puppy nursery. See how I made cute wall hangings, and transformed a hippo to a puppy. I also sewed my own crib set, bouncy chair cover, & co-sleeper cover!


I materialized a mudroom out of our entryway closet. Check it out!

I paint on anything and everything, from dishes to coffee tables. Sometimes, I'm even traditional to paint on a canvas or 2 ;-)


I love to repurpose things. See how we made our dining room table into a coffee table!

I spend practically nothing on decorating. Don't believe me? Let me count the ways I do it ;-)


I like to bake and decorate cake, although I'm really an amateur... but I don't let that stop me! I also love to throw parties. Check out some elegant party ideas here, or some cutesier ideas here.


I love to craft, and think presents are so much more meaningful when they are handmade. Here's an idea for making someone a special wedding present they'll remember forever, and here's an idea for a unique baby present. :-)


Although I'm really bad at organization, I have blogged about some organizational ideas that help me out. Some of my favorite organizational posts are about organizing your DVDs, setting boundaries for toys, and organizing your baby bag.

I also love to post about seasonal stuff. Here's a St. Valentine's Day idea. Also, check out some of my Easter ideas like teaching your children the true meaning of Easter through DIY Resurrection Eggs, or check out my thrifty Easter posts and learn how to make your own egg dye, and make some affordable basket stuffers! And don't miss St. Patrick's Day games and party ideas!


We used to own a house, and we fixed it up ourselves. The only professionals we hired were for laying the carpet. Check out the before and after pictures!

Thanks for checking out The Masked Mommy! I hope to see you around. You know how all of us bloggers thrive on comments and followers ;-)