
Showing posts with label Tightwadding. Show all posts

Thursday, August 27, 2009

Make a Mail Sorter out of Junk Mail!

This is an oldie but a goodie, so I'm re-posting it today, and linking up at Kimba's DIY Party! :-)

I had some requests to go through with my cereal box paper sorter, so here goes! You can make it yourself today out of things you already have around your house! I really did use my junk mail!

Want to make your own? Read on, my friends!

What you'll need: An assortment of small boxes, a marker, a ruler, a utility knife or scissors, masking tape, junk mail/newspaper, flour, and water. Told you you already have what you need!
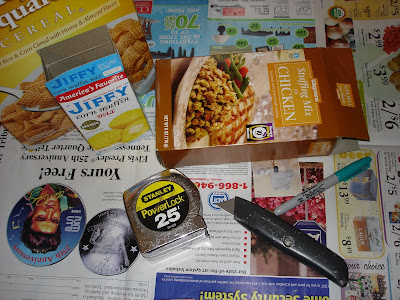
Measure, mark, and cut your boxes to the shape and sizes you need. This is such a great project because you can do it with your exact needs in mind! How big should it be? How many separate places for papers to you need?
Next, use masking tape to arrange the boxes into your desired mail sorter. (Do not substitute a different tape because otherwise the paper mache will not stick.) I also attached some smaller boxes to the side, but I failed to take a picture of that at that stage...
Paper mache time! You can get special paste for paper mache, but I just mix flour and water. The ratio is about 1 part flour to 4 parts water. Tear your newspaper into strips (avoiding the shiny sale fliers) and dip them into your bowl. Then run the strip between your fingers, removing all the excess. (You only need it to be wet- not globby.)
For anything detailed, you'll want to use "nubs". See how I used nubs around my edges? Using many smaller pieces is going to be easier and leave a better texture than using large pieces. Save those long strips for the larger areas.
Ok, now here's an intermediate paper mache lesson. If you want to add a design or a monogram, here's what you do. Twist your newspaper into a tube and use masking tape to tack it down in your desired shape. Then use your paper mache nubs to tack it down. Do not do detailed work with strips. Remember to slick all your edges down.
Let it dry overnight...
Then paint or decorate as desired! I used some leftover wall paint, but you could use some acrylic craft paint, or even spray paint! I love the little apple barrel paints you can get at Wal-Mart.
Paper mache is totally underestimated as a medium. The possibilities are endless! Be creative!

Thursday, August 20, 2009

Let Me Count The Ways... Porch and Yard Edition

My porch is likely my favorite place in our entire farmhouse. It's peaceful, it has an amazing view, and the constant breeze is unbelievable!


However, we moved from our tiny townhouse and therefore had absolutely no furniture for our porch whatsoever. As usual, my superpower to buy practically everything in our home used came through for us once again! ;-)


1. Folding bench thing, FREE! I found this beside a dumpster outside a friend's house. It was too big to fit in my car, so I left a note on my husband's van begging him to go by and get it for me. When he was brought it home for me, it felt better than getting a bouquet of flowers! {lovey tightwad sigh}


2. Kid's Table, $4. I got this table and 3 folding chairs for 4 bucks. I'm still looking to replace it with something wooden, but it's working for now.


3. Amazing table and chairs, $30!!! This is my favorite "find" on our porch! I saw it at a yard sale, but couldn't talk the people down farther than $60. (I can't blame them. It's really a good quality set). My husband surprised me the next day by driving to their house, knocking on their door, and asking if they'd take $30! And they totally did! {another lovey tightwad sigh} The Masked Husband truly is my hero!!! (Yes, even superheros have heros) I love this table so much, here's another picture of it:


5. Kiddie Slide, FREE! Found it on the curb. You know how my saying is "it's only embarrassing to take something off the curb until you get it into your car. Then you get to keep it forever"? Well, if you take it from the house 3 doors down, it's embarrassing for longer because your neighbors know you took it. Lol!

(Do you guys love how I skipped number 4? Ok, moving on!)

6. Kiddie Swing, $5. Yard sale find. I talked them down a little. My kids love it, and it's shaped like an airplane!


7. World's largest kiddie pool, or world's smallest adult pool (however you want to look at it), $10. We got this at a yard sale 2 weekends ago, and it's been a huge hit! I don't think adult people are supposed to be excited about such a small pool... but we're easy to please around here ;-)

I love our porch and yard! And my secondhand super savvyness makes is even better!


And my favorite thing about my porch? Watching the Masked Children enjoy their yard and cheap yard sale toys from my awesome table and chairs! ;-)


I'm linking this up at the "Price My Space" party over at the Nester's.

Monday, July 13, 2009

Let Me Count The Ways... $163 for all the furniture and decorations in my entire living room!

Filling a living room with furniture and decor for $163 sounds like a job for... The Masked Mommy! Now, lets see if I can name my prices faster than a speeding bullet ;-)

(Just so you guys don't think I'm cheating by skipping this picture, these purple curtains were sewn by my mom years ago for my college dorm room, the pillow was from my bed as a little girl, and the quilt was sewn and given to me by my mother-in-law, and is placed strategically to hide the hole in our couch ;-)

I don't have everything set up how I want it yet in our farmhouse, so these pictures are from the townhouse before we moved.


  • 1. Computer armoire- Found it on Craigslist for $25. This was an amazing find!
  • 2. Pie Stand- Christmas present from my mom. Random, but pretty. $0
  • 3. Vases- I threw these myself in ceramics class. $0 (or price of tuition I suppose ;-)
  • 4. F.R.I.E.N.D.S. frame- I made this myself from paper mache. I make lots of things from paper mache. $0
  • 5. St. Joseph Picture- Conformation present for my husband from his mother. $0
  • 6. Chairs- I got 4 of these chairs along with their matching table at a yard sale and paid $25 for the set. The dining room table that came with these is now our coffee table.
  • 7. Purple Wreath- I'm sure you're all thinking this wreath is super tacky, but I LOVE it! I overpaid for it at a yard sale. It was $8.
  • 8. Table- This was abandoned in a rental house we used to live in. $0
  • 9. Table Cloth- Burlington Coat Factory, bay-bee! $3!
  • 10. Checker board- Christmas gift. $0
  • 11. St. Cecilia picture- Rummaged from my parent's attic. $0
  • 12. Bookshelf- Curb find. $0


  • 13. Frames- Birthday gift. I filled them myself with wedding pictures printed from my home computer. $0
  • 14. Lamps- Last Christmas we got this set of 4 matching lamps. It was awesome because we were relying on overhead lights before then, and you all know what the Nester thinks about overhead lighting ;-). $0
  • 15. Wall Stickers- From the Dollar Tree. I love their wall stickers because we are renters, so our walls are always white and I can't stencil anything on them. These add a lot of character. $1
  • 16. Child's rocking chair- I got this at a yard sale for $1! When I asked how much it was, I couldn't believe the guy only wanted a dollar. It really never hurts to ask :-)
  • 17. Coffee table- Remember those chairs I talked about on the other side of the room? This is the dining room table that came with them at that yard sale. We got a bigger table for our dining room, so we converted this one to a coffee table. You can see my post about that here. This is included above in the $25 we paid for the table with the chairs.
  • 18. Clock- I got this clock at Big Lots for $4! It was on clearance because the faceplate was all scratched up, so I just brought it home and popped off the face cover with a butter knife, and voila! I love this clock! (I never go into a store without checking out their clearance).
  • 19. Couch- These we got for free from Craigslist. When we moved we had no couch at all, so I just watched Craigslist until I found something suitable for free. There was a big hole in one of the arms, but I just keep a folded quilt over it and no one ever knows. $0
  • 20. TV Armoire- $50 at a yard sale. I had been watching craigslist for a deal, and nearly wet my pants when I pulled up and saw this at a yard sale! But I somehow managed to keep my cool and talked the lady down from $75. I love being able to close the cabinet and not see any TV or movie clutter!
  • 21. End Table- I almost forgot about this little guy. He was another curb find. You know, when you see something you want sitting out on the curb, it's only embarrassing to take it for as long as it takes you to pull over and shove it in your car. Then you're free, and you have something awesome forever! $0
  • 22. Flowers- I got these at a yard sale for $1.


  • 23. Mirror- Wedding present. $0
  • 24. Purple Vases- These were a present from my mom to use in my wedding. They were on mega clearance at Hobby Lobby because they had cracks, but I just turn the bad side to the back. $0
  • 25. The Baskets- Dun dun duh!!! These are the most overpriced items in my living room. These were bought after a search for used baskets that turned up dry. I bought them half off at Michael's for $15 each, so that comes to a total of $45! (drop head in shame). It's more than I usually spend on anything, but I do really love them. These were bought after my husband graduated from college and we actually had some extra money.
So there you go! $163 for every piece of furniture and decoration in my entire living room.

My husband only graduated from college 1 year ago, so we were really poor the first 4 yearsof our marriage. The last year my husband was in college (2008) he made only $11,000 and supported our growing family of 3, so learning to tightwad was a necessity for me. Practically everything in our home is used, and we still spend according to similar standards even though he has a real job now. When he first graduated, the 2 armoires were my furniture splurge for the living room. I checked craigslist and watched at thrift stores for about 2 months before I acquired them both at the price I desired. I believe the secret behind finding every good deal is the patience to wait for the right price.

Thanks for stopping by! Can't wait to see what everyone else has posted! Check out the Price my Space party here. :-)

Friday, April 24, 2009

Decorating Thrifty... 20 Ways I Saved!

This is my daughter's bedroom decor. I call this room's design "Flutter Bunny". It's a mixture of butterflies and bunnies, mostly in purple. Want to know how much I paid? Practically nothing. Intrigued? Keep reading!

Ok, here's the Rundown ;-)

  1. Butterfly Wings on the wall- (actually the kind meant to wear on Halloween... which I did take them down once and use them for a costume). These were trash picked. Yep, you heard me right. Straight from a dumpster. What can I say? Lucky find!
  2. Bed, nightstand, dresser, box spring and mattress bought on Craigslist in one listing for $80. The best part... the bunny was already painted on the headboard!
  3. Lamp Shade- Bought on clearance at Babies R Us. It was a splurge at the time for $12. I later regretted it, and therefore decorated my own lampshade for my son's nursery.
  4. Lamp- handed down to me from my little brother's room.
  5. Ottoman- handed down to us from my brother. I used to to keep my daughter from rolling out of bed at night. We couldn't afford a bed rail at the time. It was ugly, so I laid a quilt over it that was mine when I was a baby.
  6. Adorable Bunny Bedspread- This was a random Easter present from an Aunt. It was totally random, but I quickly yanked off the quilt that was there when this appeared in the mail!
  7. Throw pillows from my bed when I was a little girl.
  8. Butterfly wall hanging from the Dollar Spot at Target.
  9. Curtains- This is one of my favorite deals! I found this crib skirt on clearance for $1!!! Then I cut off the cute side sections that hang down, folded the fabric under, and stuck them straight on the trim with thumb tacks! :-)
  10. White flowers- Left over from our wedding.
  11. Bed Canopy- I purchased this at the $1/pound Goodwill Clearance center in Columbia SC. Because it was super lightweight, it probably cost less than $2!
  12. Purple quilt- Made with love by Grandma and given as a baby present.
  13. Purple Lamp- Purchased from Goodwill. It cost $7 for the lamp with the shade.
  14. Another quilt- Made with love by Great Grandma. It is covering some seriously ugly garage-style plastic shelves with toys underneath.
  15. Easter basket- My mom gave this to my daughter for her first Easter. It was really big, so I just use it in her bedroom to hold her Beanie Babies.
  16. Really cute trash can- I have 3 of these. I found them on clearance at Gabriel Brother's for $2 each. They're great for holding toys!
  17. Quilted bunny- Made for my by my mom when I was little.
  18. Ugly chair- Handed down to me by my brother (along with the ugly ottoman beside her bed). Both are covered with quilts.
  19. Adorable quilted clock- found on clearance for $2.99 at Hobby Lobby. They have great clearance!
  20. Little butterfly- I made that little guy from a coffee filter, watercolor paints, and a clothes pin.
It's very important when you're trying to save money to make do with what you have until you find the right deal on what you're looking for. I didn't go out and buy a bunny quilt. I was using what I had until a good deal presented itself. (Or a free deal in that case.) I'm very persistent to find things on the used market rather than at stores, and I try very hard to work with what I already have. After all, it is in my superpower oath that I am to defend the dollars of our family! :-)

You can see my other decorating posts here. Thanks for stopping by, Shabby Nesters! For anyone who's interested in more thrifty decorating ideas, stop by the Shabby Nest Today to check out Frugal Friday's Linky Party! :-)

*Updated to Say* I totally forgot! The little white table beside the chair was a curb find. When you find something on the curb you want, remember this: It's only embarrassing to take it for as long as it takes you to stick it in the car and drive away, but then you get to keep it forever! And if anyone asks, you were just looking for boxes. Or your retainer ;-)

Saturday, April 11, 2009

Forgot to pick up an egg dying kit? No Problem!

All you need to dye your eggs is:
  • 1/2 cup of water
  • 1 tsp vinegar
  • 20 drops of food coloring
(This is per color)


That's it! Just mix and dip! Cheap and easy!

I made just primary colors so we could practice dipping the
eggs in multiple dyes to create our own secondary colors.

Mixing our own green and orange by dipping in multiple dyes worked out well, but as you can see by this egg on top, the "purple" was less than desirable. It's a hard color to mix.


I hope I saved at least one of you "Easter Procrastinators" out there a trip to the store. I sure saved myself a trip to the store! Happy Easter, Everyone!

Thursday, April 9, 2009

Small Successes

Today, I'm participating in Faith & Family Live's Small Successes. This has been a really busy week for me being Holy Week and all, but also we're traveling to Michigan on Good Friday for our new Goddaughter's baptism, and my son's 1st birthday is on Holy Saturday. Plus, I had an Easter party for my mother's group on Tuesday. So I have had a very very busy week. I thought I wouldn't get time for any "extras" between the packing and planning, but I have 3 small successes to share with you today!

1. I did a cute hand print Easter Lily craft with my 3 year old daughter. You can find the directions here. She loved it- especially the cutting! I am always meaning to do more art projects with her, so this was actually quite a success for me!

2. I made a set of Holy Week Eggs for my daughter. These are more commonly known as "Resurrection Eggs". Click here to see my directions to make your own set. It's a great way to go over Holy Week traditions with your kidos, and you just make them out of stuff you already have around your home! I was surprised at how much my 3 year old learned. Yesterday, she was playing with the palm from one and saying "Jesus rode in on a donkey!". It was so cute!


3. I made thrifty Easter basket treats. Yay! Check them out:


To make your own goldfish carrots, use fold-top sandwich baggies, fold as indicated in the picture below, and hold with a few pieces of tape. I won't insult your intelligence by explaining how to fill the bags and tie them with green ribbon. ;-) I found this idea on One Pretty Thing (one of my favorite blogs!)

You can print the labels for these "lamb tails" here. Honestly, I think making "bunny tails" out of marshmallows is a cuter idea, but the lamb thing seemed more Jesus centered rather than just piling on the Easter Bunny stuff.


These are just very inexpensive butter cookies with a spice drop in the middle. If your spice drop is a little too small to stay in the flower, give it a little "squish" by pinching it after inserting the spice drop in the cookie. Yes, you will break a few cookies :-) I got this amazing idea from Brenda at Party Planning Mom. Love her blog!


Ok, those are my 3 small successes this week. Time to go back to running around like a chicken with my head cut off getting ready for our car trip! So much for finding time for reflection on this Holy Thursday! :-)

Wednesday, April 8, 2009

DIY Resurrection Eggs with 2 Dozen Ideas!

I'm trying to celebrate holy week with my daughter (who is 3) this year, and as I was looking for ideas, I ran across Resurrection Eggs. You can buy them, or you can be amazingly thrifty and crafty and make your own :-)

This idea originated from the children's book Benjamin's Box: The Story of the Resurrection Egg.

Benjamin's Box: The Story of the Resurrection Eggs

I opted for the tightwad way (as I always do) and I wanted the eggs to include as many Catholic holy week traditions as possible. I also wanted to make sure to tell the whole Easter story rather than just try to come up with the cutest stuff to put in eggs. So here's what I came up with:

How I made my "Resurrection Eggs" or "Holy Week Eggs":
  1. Palm Branch (Made out of a leaf from a fake flower arrangement. I just sliced "palm branches" into it with some scissors.)
  2. Soap (For when Jesus washes the feet of the disciples. I wanted to include this since feet are washed during the Holy Thursday mass.)
  3. Cracker (For the last supper.)
  4. Flower (For when Jesus asked his apostles to stay awake with him in the garden. I wanted to include this since it is symbolic of the Catholic tradition of staying up in adoration Thursday night.)
  5. Dimes (For the 30 pieces of silver that Judas betrayed Jesus for.)
  6. Ropes (For bounding and arresting Jesus. I think this is a pretty crucial point for the story.)
  7. Crown of Thorns (I made mine from a twig I pulled from a tree in my front yard. Make sure you get a green one so it's flexible enough to weave it into a circle. Don't worry if it snaps in a few places when you're weaving it- mine did, too.)
  8. Nails (self explanatory)
  9. Crucifix (Mine is from a broken rosary. You could also just stuff a whole rosary in there, or make a cross from toothpicks.)
  10. Sponge with Vinegar (I just whacked off a piece from my kitchen sponge.)
  11. Spices and Fabric (For preparing the body for burial. I just put some oregano in a ziplock bag and tied it off with a knot.)
  12. Stone (just a piece of gravel will do.)
Some more ideas I came across for Resurrection Eggs were: A Die (for the soldiers casting lots for Jesus' garments), Fur (for the donkey Jesus rode in on), A Feather (for the rooster crowing), A Thick String (for the scourging), Small Piece of Wash Cloth (for washing of feet), Small Cup (for when Jesus says "let this cup pass from me"), A Black Cloth (for when the sky went black), Small Piece of Rose Bush Stem (in place of crown of thorns), An Empty Egg (for the empty tomb) or a Cloth (for finding empty burial cloths in the tomb), Cotton Ball with Perfume (for the perfume Mary put on Jesus' feet), Purple Cloth (for the robes they wrapped Jesus in), and a Sign that says "King of the Jews".

There's really no reason why you can't make 2 dozen resurrection eggs with all of these ideas! :-)

When you've collected your stuff, just put them all in some plastic eggs...


And number them!

And if you're not the "do it yourself" kind, you can order sets of Resurrection Eggs that are already made, although you can't buy stations of the cross eggs.
Resurrection Eggs

Then you can just put them into an egg carton and decorate it! For younger kids, you go over what each piece stands for and pass it around so they can hold it. For older kids, include a piece of paper in each one with an explanation, and a bible verse they can look up for that part of the story! :-)

What Jesus did for us during this week of his life is so amazing! Share it with your children. Don't just allow the true meaning of this amazing holiday to get lost in the Easter Bunny shuffle!

You still have time to do this, and the stuff can be found around your home :-) It worked for me! To see other Works for me Wednesday posts or particiate yourself, click here.

Click here to see pictures of my last minute Easter Party!

Disclaimer: This post contains affiliate links.

Tuesday, March 31, 2009

Mod Podge Mania!

Xazmin is having a Mod Podge Mania party today where we all get to show off a mod podge project! Her blog is so awesome, I just had to play ;-) In fact, I forgot about it until last night, and then wandered around my house looking for something to share. Well... I've found the perfect thing!

I'm kinda cheating though because I didn't make this myself (although Xazmin said that was ok). It was a wedding present to me. This is the best do it yourself wedding present ever! It is a very thrifty project to do, and it is sure to be cherished by the bride and groom for years to come! Well... the bride anyway. Hehe!

Here's my Wedding Candle!

When my friend came to our wedding, she took a few programs, then used them to mod podge a keepsake wedding candle for us! See the original program?

In this picture you can see she cut out some of the individual rings and flowers to place around the top and bottom. They're layered on. She did such a beautiful job!

This side has my invitation.

Here's the original invitation. She didn't use the background from my invitation, only the velum overlay with the words on it.


She even used the bow from her invitation we sent her. So cute!

Who doesn't need a DIY wedding present idea in today's economy? Click here to see some recipes for making your own mod podge (which makes this project even thriftier!)

*Disclaimer* I have no idea whether or not you should actually light the candle :-) I've had mine for 4 years, and it's holding up well, but it hasn't ever been lit. However, the lady who gave it to me said that she lights hers every year on her anniversary during dinner. If I were to make one of these myself, I'd use a really mega fat candle. That way, the outside never burns down anyhow. Hope your creative cogs are turning! You could do this same thing with a birth announcement, a prayer, a photograph- the possibilities are endless!

Thanks for hosting, Xazmin!

And for any of you who love a chance to link up, come back tomorrow to link up your cabinet posts for our Cabinet Powwow!