


I had some requests to go through with my cereal box paper sorter, so here goes! You can make it yourself today out of things you already have around your house! I really did use my junk mail!
Want to make your own? Read on, my friends!

What you'll need: An assortment of small boxes, a marker, a ruler, a utility knife or scissors, masking tape, junk mail/newspaper, flour, and water. Told you you already have what you need!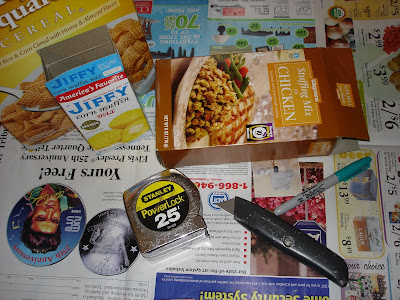


Measure, mark, and cut your boxes to the shape and sizes you need. This is such a great project because you can do it with your exact needs in mind! How big should it be? How many separate places for papers to you need?
Next, use masking tape to arrange the boxes into your desired mail sorter. (Do not substitute a different tape because otherwise the paper mache will not stick.) I also attached some smaller boxes to the side, but I failed to take a picture of that at that stage...
Paper mache time! You can get special paste for paper mache, but I just mix flour and water. The ratio is about 1 part flour to 4 parts water. Tear your newspaper into strips (avoiding the shiny sale fliers) and dip them into your bowl. Then run the strip between your fingers, removing all the excess. (You only need it to be wet- not globby.)

For anything detailed, you'll want to use "nubs". See how I used nubs around my edges? Using many smaller pieces is going to be easier and leave a better texture than using large pieces. Save those long strips for the larger areas.

Ok, now here's an intermediate paper mache lesson. If you want to add a design or a monogram, here's what you do. Twist your newspaper into a tube and use masking tape to tack it down in your desired shape. Then use your paper mache nubs to tack it down. Do not do detailed work with strips. Remember to slick all your edges down.

Let it dry overnight...

Then paint or decorate as desired! I used some leftover wall paint, but you could use some acrylic craft paint, or even spray paint! I love the little apple barrel paints you can get at Wal-Mart.
Paper mache is totally underestimated as a medium. The possibilities are endless! Be creative!


11 comments:
nice.. it turned out very cool! :)
um....."pretty" much a fabulous idea! Well Done! I will be linking as well for my sunday links post!
Congrats on being featured and thank you for the blog award! Made my morning!
love it!
Cool, cool, cool idea! I've been using things from around the house for different kinds of storage rather than go buy baskets, etc. lately and this is a COOL idea! I love it and am going to feature it on my frugal blog. I can't wait to make my own!!
-Heather
wow! I have been thinking of making cereal boxes as sorter but didn't know how to cover it! Then I found this blog today out of the blue! wow Im gonna do this too! thanks!
What a super idea! I've been needing something to organize a little spot in my kitchen (mail, papers etc) and this is perfect! I can think of several uses for it. Thanks for sharing this!
Cathy :)
Found you via Tip Junkie. This is such an awesome idea, I might need to steal it!
I love recycling projects the most, thanks for sharing. Maybe I'll make one slot for each kid for school papers!
uh oh... my wheels are turning!
Very creative, very green, very useful. I like!!!! And thanks for visiting my blog & leaving me a comment.
Your blog keeps getting better and better! Your older articles are not as good as newer ones you have a lot more creativity and originality now keep it up!
Post a Comment