Showing posts with label Do It Yourself. Show all posts

Saturday, January 23, 2010

Fake Mod Podge Furniture Tutorial

I just LOVE unique furniture (and unique anything else in my house for that matter)! I really wanted to mod podge some scrapbooking paper to the inside of my newly facelifted hutch, but I didn't want to commit to it. So I came up with a removable solution :-)

Removable Furniture Decoration

Start with a piece of foam board. Mine came from the Dollar Tree. Cut it to be the same shape and size as the flat surface where you want to create your faux mod podge look. You may have to cut some nooks and crannies...


If you need to piece it together, just do it with some glue and foam board scraps like this.

This is the final shape I ended up needing. Once you have your piece cut to fit your furniture, go ahead and glue on your scrapbooking paper. I just used a glue stick, and I wasn't super particular about lining it up at the edges. Whatever ;-)


This is what you'll have. Now it's time to insert it into your furniture!

Just put it where it goes... and...


Voila! Fake Mod Podged furniture :-)


This is so simple, easy, and cheap that there's no reason not to try it! You could switch them out for the seasons- or whenever you felt like having something new to look at! Best part it- your hubby can't get upset that you did something else "weird" to one of the pieces of furniture because it's totally removable :-D

Friday, January 22, 2010

Furniture Makeover

I found this great hutch thing at the Salvation Army here for $35. It was love at first site!


But barn red really isn't my color. So rather than doing something totally outrageous (like I would have liked to do) I painted it black. Classy. Simple. Sleek. I thought that would be best since I am going to put it in our entry way :-)
Kind of boring for me? Not quite. Check out the little surprise you get when you open the cabinets and drawers!


I love me some purple! The best part? I got the whole gallon of purple paint for $3.95 because it was a 'mistint' or 'oops paint'. If any of you aren't checking the oops paint shelf every time you go into Wal-Mart, Home Depot, or Lowes, you're missing out!

Wait until you guys see all the other projects I've been doing around here. I've been too busy actually doing to stop long enough to blog about it... which lets face it- that's the funnest part! So stay tuned to see my completed entry way makeover :-)

See what I did to this piece of furniture next here!

Monday, December 7, 2009

Fairy Peg Dolls

Continuing my princess crafts for my daughter's Christmas presents, I made some fairies to go with her princess dolls. :-)


To Make your own, paint the peg doll and seal it like this and have 5 appropriately colored pom pom balls ready. Hot glue them on to make the skirt :-)


Cut the wings from felt and paint anything you desire on them. When they're dry, glue them to your fairy's back.

Voila! Fairy Peg Dolls! :-)

Sunday, November 29, 2009

DIY Bob The Tomato Toy

I'm still working on my homemade kids presents for Christmas. I made a cute little veggie tales toy today. It was super cheap, easy, and fast. Check out the finished project:


Click here to find directions on how to make it yourself
on my other blog! :-)

Wednesday, November 25, 2009

DIY Princess Furniture

Remember my Princess Peg Dolls? Well, they're in need of a place to live and some furniture. I decided to start with a bed horribly uncomfortable to real princesses everywhere ;-)

Princess and the Pea Bed!


What you need:
  • Some wooden hearts (.25 at Michael's, AC Moore, or Joanne's Fabric) with one of them slightly sawed off at the bottom
  • A variety of felt and fun foam (both available at the Dollar Tree)
  • Some Popsicle sticks
  • One green bead
  • Hot Glue

Start by gluing your green bead "pea" to one of your Popsicle sticks. Then connect the 2 sticks with your first pieces of fun foam for the base of your bed as shown.


Now just keep gluing on sheet after sheet of your desired arrangement of fun foam and felt rectangles. I think the story indicates 20 mattresses and 20 blankets. I had a total of 30 something.

When you've reached your desired height, finish it off with a felt blanket and pillow. Last, glue on the hearts for your head and foot board, and decorate as desired! Voila! A Princess and the Pea bed that you made yourself!


Ok, gotta go. Lots of more princesses, furniture, and castles to work on ;-)

Monday, November 23, 2009

Princess Peg Dolls

Anyone else making homemade Christmas presents this year? I'm making a whole slew of princess peg dolls for my daughter. This is the first batch. These were actually a present for my niece's birthday, so when I make them for my daughter I'll take pictures along the way and give you guys some tutorials.

Left to Right:
Rapunzel, Pink Princess, Prince Charming, Green Fairy
How To Make:

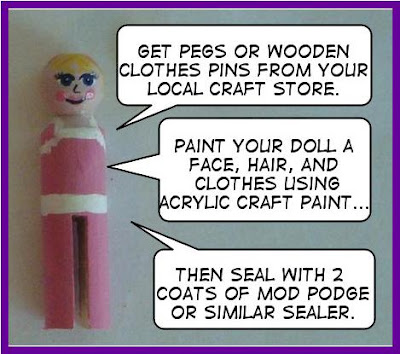
They all need to be painted and sealed first. Click here to see the directions I found for painting these. It worked really well and was super easy!

Rapunzel~ Her braid is made from 3 strips of braided felt. I glued it on her head and then hid it by making a princess hat from felt and a scrap of sheer fabric. Her skirt was made from pieces of lace. Detailed directions for making the skirt can be found here. All of it was hot glued on.

Pink Princess~ Once painted, make the crown from felt and red glitter glue. Use hot glue to attach the crown. For directions on how to make the skirt, see my post here.

Prince Charming~ After painting, cut the sword from foil and attach with a glue stick. Seal over the top with your same sealer and make his belt from felt. Then paint the handle for the sword. Fashion his crown from felt with red glitter glue dots and hot glue onto his head.

Green Fairy (aka Tinker Bell)~ Paint her leotard down to the top of her legs. When done painting doll, glue pom pom balls around her for the "skirt". Her wings and bow are cut from felt and then hot glued on. Don't forget to cover her with glitter "fairy dust" ;-) Be sure to seal over the glitter to prevent it from coming off.Hope you enjoyed the diy instructions! Now go make some fairy tale Christmas presents ;-)

Remember to check back for more directions! Soon I'll be posting on making more fairy tale dolls, making princess furniture, and also making a castle for all of them to live in :-D

Saturday, October 17, 2009

Halloween Peg Dolls

Hi everyone! Made these cute Halloween peg people and thought y'all might be interested in seeing how to do it yourself ;-)


First, paint your peg people as desired. (Make sure to paint their heads and their feet. Their middle will be covered with scrapbooking paper). Next, pick some fun papers to go with them. I used all papers that I already had, so some of them weren't as perfect as I had hoped they would be. 

Then, just mod podge the papers on. When you do this, cover the entire peg doll in the protective top coating to keep your paint from chipping off. This will also make them nice and shiny. When you're all done, you can cut felt accessories out for hats, leaves, hair, wings, etc and just hot glue them on. 

I made the following halloween peg people (from left to right) A skeleton, A One eyed one horned flying purple people eater (complete with music note paper for the rock-n-roll music he plays through the horn in his head), a pumpkin, a mummy, a witch, Count Dracula (with number paper), a black cat, Frankenstein, and a ghost. 

The Mummy was a little different. I painted the peg completely black, then wrapped him in a thin strip of masking tape and mod podged over the top. 


If you make some, let me know so I can some see them on your blog! :-)

Happy Halloween, everyone! 

Wednesday, September 2, 2009

Introducing My Peg Family

Peg dolls, clothes pin dolls, wooden peg people... whatever you want to call them, I'm hooked on making them! :-)

{Meet My Peg Family}

{How to make peg dolls}


I linked up today at Kimba's DIY party! :-)

Thursday, August 27, 2009

Rescue and Revive!

As a Superhero, when I see a poor defenseless piece of furniture (or something else that needs salvaging) on the curb crying out for help, I have to comply. I mean, it's in the superhero oath and everything ;-)

Here are some of my projects I've posted about. Click the links to see the details.


Make a Mail Sorter out of Junk Mail!

This is an oldie but a goodie, so I'm re-posting it today, and linking up at Kimba's DIY Party! :-)

I had some requests to go through with my cereal box paper sorter, so here goes! You can make it yourself today out of things you already have around your house! I really did use my junk mail!

Want to make your own? Read on, my friends!

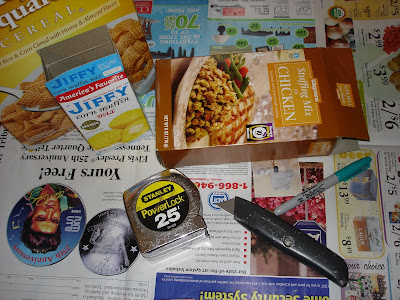
What you'll need: An assortment of small boxes, a marker, a ruler, a utility knife or scissors, masking tape, junk mail/newspaper, flour, and water. Told you you already have what you need!
Measure, mark, and cut your boxes to the shape and sizes you need. This is such a great project because you can do it with your exact needs in mind! How big should it be? How many separate places for papers to you need?
Next, use masking tape to arrange the boxes into your desired mail sorter. (Do not substitute a different tape because otherwise the paper mache will not stick.) I also attached some smaller boxes to the side, but I failed to take a picture of that at that stage...
Paper mache time! You can get special paste for paper mache, but I just mix flour and water. The ratio is about 1 part flour to 4 parts water. Tear your newspaper into strips (avoiding the shiny sale fliers) and dip them into your bowl. Then run the strip between your fingers, removing all the excess. (You only need it to be wet- not globby.)
For anything detailed, you'll want to use "nubs". See how I used nubs around my edges? Using many smaller pieces is going to be easier and leave a better texture than using large pieces. Save those long strips for the larger areas.
Ok, now here's an intermediate paper mache lesson. If you want to add a design or a monogram, here's what you do. Twist your newspaper into a tube and use masking tape to tack it down in your desired shape. Then use your paper mache nubs to tack it down. Do not do detailed work with strips. Remember to slick all your edges down.
Let it dry overnight...
Then paint or decorate as desired! I used some leftover wall paint, but you could use some acrylic craft paint, or even spray paint! I love the little apple barrel paints you can get at Wal-Mart.
Paper mache is totally underestimated as a medium. The possibilities are endless! Be creative!