Showing posts with label Kids. Show all posts

Monday, December 14, 2009

Nativity Lunch

Over at Muffin Tin Monday today, the theme is Christmas Stories. I decided to tell the ultimate Christmas story today with our Muffin Tin Meal... The Nativity! :-)


My daughter loved it, and actually completely refused to eat baby Jesus ;-).

In My Tin:

Mary, Jesus, and Joseph- All made from pigs in a blanket with dotted eyes made from colored decorating gel.

3 Kings, symbolized by 3 crowns of cheese toast and an animal cracker camel.

An angel cut from cheese with a cookie cutter.

2 animal cracker sheep to stand for the shepherds.

To make the muffin tin look like a stable, I topped it with 2 pretzel rods and a the star of Bethlehem, cut from another piece of cheese.


I think some of this would be cute food for children Christmas parties. I wish I had had time to make the angel a beautiful sugar cookie, but you can only do what you can do, right? I thought it would have also been cool to have a little candy cane in the shepherd's cup. Can't wait to see everyone else's creations! :-)

Monday, December 7, 2009

Fairy Peg Dolls

Continuing my princess crafts for my daughter's Christmas presents, I made some fairies to go with her princess dolls. :-)


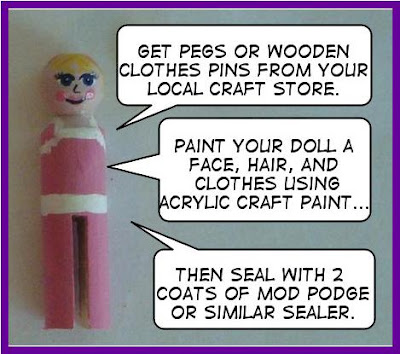
To Make your own, paint the peg doll and seal it like this and have 5 appropriately colored pom pom balls ready. Hot glue them on to make the skirt :-)


Cut the wings from felt and paint anything you desire on them. When they're dry, glue them to your fairy's back.

Voila! Fairy Peg Dolls! :-)

Monday, November 30, 2009

Princess Food

Today's Muffin Tin Monday didn't have a theme, so I made my daughter a princess muffin tin!


In the Tin:
  • Sleeping Beauty's Spinning Wheel Pasta
  • A Princess crown (Bread with melted cheese and pepperoni "jewels")
  • Cinderella's glass slipper (made from a blue jello jiggler)
  • Peas (for the princess and the pea)
  • Snow White's Poisoned Apple (Apple dripped in melted white chocolate chips with green food coloring and a string tied on for where the witch dipped it)
  • Cinderella's "Pumpkin" carriage (made from a pumpkin pancake with candy wheels.)
Accompanied by...
  • Magic Wand (more melted cheese on bread stuck to a pretzel rod with peanut butter)
  • Magic Potion (Sparkling Juice in a fun bottle)

I wish I would have had the time to make Cinderella's pumpkin carriage out of these pumpkin pie bites from Bakerella. Wouldn't that be adorable?! I would give them blueberry wheels. Maybe I'll use that idea for my daughter's Princess Birthday Party coming up in February.

Can't wait to see what everyone else has in their tin this week! :-)

Other Princess-Related Tins:


Sunday, November 29, 2009

DIY Bob The Tomato Toy

I'm still working on my homemade kids presents for Christmas. I made a cute little veggie tales toy today. It was super cheap, easy, and fast. Check out the finished project:


Click here to find directions on how to make it yourself
on my other blog! :-)

Wednesday, November 25, 2009

DIY Princess Furniture

Remember my Princess Peg Dolls? Well, they're in need of a place to live and some furniture. I decided to start with a bed horribly uncomfortable to real princesses everywhere ;-)

Princess and the Pea Bed!


What you need:
  • Some wooden hearts (.25 at Michael's, AC Moore, or Joanne's Fabric) with one of them slightly sawed off at the bottom
  • A variety of felt and fun foam (both available at the Dollar Tree)
  • Some Popsicle sticks
  • One green bead
  • Hot Glue

Start by gluing your green bead "pea" to one of your Popsicle sticks. Then connect the 2 sticks with your first pieces of fun foam for the base of your bed as shown.


Now just keep gluing on sheet after sheet of your desired arrangement of fun foam and felt rectangles. I think the story indicates 20 mattresses and 20 blankets. I had a total of 30 something.

When you've reached your desired height, finish it off with a felt blanket and pillow. Last, glue on the hearts for your head and foot board, and decorate as desired! Voila! A Princess and the Pea bed that you made yourself!


Ok, gotta go. Lots of more princesses, furniture, and castles to work on ;-)

Monday, November 23, 2009

Princess Peg Dolls

Anyone else making homemade Christmas presents this year? I'm making a whole slew of princess peg dolls for my daughter. This is the first batch. These were actually a present for my niece's birthday, so when I make them for my daughter I'll take pictures along the way and give you guys some tutorials.

Left to Right:
Rapunzel, Pink Princess, Prince Charming, Green Fairy
How To Make:

They all need to be painted and sealed first. Click here to see the directions I found for painting these. It worked really well and was super easy!

Rapunzel~ Her braid is made from 3 strips of braided felt. I glued it on her head and then hid it by making a princess hat from felt and a scrap of sheer fabric. Her skirt was made from pieces of lace. Detailed directions for making the skirt can be found here. All of it was hot glued on.

Pink Princess~ Once painted, make the crown from felt and red glitter glue. Use hot glue to attach the crown. For directions on how to make the skirt, see my post here.

Prince Charming~ After painting, cut the sword from foil and attach with a glue stick. Seal over the top with your same sealer and make his belt from felt. Then paint the handle for the sword. Fashion his crown from felt with red glitter glue dots and hot glue onto his head.

Green Fairy (aka Tinker Bell)~ Paint her leotard down to the top of her legs. When done painting doll, glue pom pom balls around her for the "skirt". Her wings and bow are cut from felt and then hot glued on. Don't forget to cover her with glitter "fairy dust" ;-) Be sure to seal over the glitter to prevent it from coming off.Hope you enjoyed the diy instructions! Now go make some fairy tale Christmas presents ;-)

Remember to check back for more directions! Soon I'll be posting on making more fairy tale dolls, making princess furniture, and also making a castle for all of them to live in :-D

Tuesday, September 8, 2009

How To Paint a Face, Step by Step...

Ok, I had so many of you tell me that you're sure your peg dolls wouldn't come out like mine because you couldn't paint them that way... so I'm here to prove you wrong! ;-)

I have broken down painting a peg doll face into very simple and easy to follow steps. No blending, no nothing. Just different colors of shapes. You think you can do that? Good! Here we go!


I linked up at Today's Creative Blog for Get Your Craft On! :-)

Wednesday, September 2, 2009

Introducing My Peg Family

Peg dolls, clothes pin dolls, wooden peg people... whatever you want to call them, I'm hooked on making them! :-)

{Meet My Peg Family}

{How to make peg dolls}


I linked up today at Kimba's DIY party! :-)

Tuesday, August 11, 2009

Firefighter Celebration!

My husband has been in fire school for the past 9 months or so, and he has finally graduated!!! :-D Yay!!!

I wanted to make him a "Congratulations" cake, so the cogs in my head started to turn. I googled "fire cake" and found some cute stuff, but I wasn't sure how adventurous I was feeling. I was staring at my daughter's play fire hat, and then it hit me... JELLO MOLD!


This was VERY easy to make. This would also make a perfect "cake" for a firefighter birthday party!

How to Make Your Own Firefighter Hat Jello Cake:
  1. Trace around the brim of your play fire hat on some cardboard before starting. This will be the brim of your hat. Either paint desired color, or cover in colored paper. Then, cover this in saran wrap and set it to the side.
  2. Rub the inside of the hat with vegetable oil, and balance in a bowl to hold it upside down. I used paper towels to hold it steady.
  3. Mix either yellow or red jello, and be sure to use a "jiggler" recipe so the jello is firm enough to hold it's shape.
  4. Pour the jello into the hat and refrigerate until firm.
  5. When the jello has firmed, run a butter knife around the edge to help loosen and turn the jello mold onto your piece of prepared cardboard.
  6. Decorate with fruit roll up "reflector strips" and/or paint directly on the jello with a soft paint brush and red food coloring.

I think it would have been even cuter in red, but my husband was moving up from his red hat to his yellow hat, so it seemed fitting to make the hat yellow ;-)


Congratulations to The Masked Husband for earning his yellow fire hat! The Masked Family is very proud of you!

Wednesday, August 5, 2009

Eat like a Superhero, and Stamp Like a Pro!

I wanted to share a food pyramid project that I did in college when I was studying to be an elementary school art teacher:


I think the food pyramid has been updated since then, but this was the correct food pyramid at the time. This is great activity to teach kids about the food pyramid because you can brainstorm what kinds of food are in each group before drawing them. It was done by making stamps from styrofoam meat trays, and I'm going to show you how to use the same technique! (Are you excited? You should be! This really is a cool project to do with kids!)

What you'll need:

  • Styrofoam Trays
  • Scissors
  • A Pen or Dull Pencil
  • Paint
  • Fabric or heavy paper for stamping
  • A Brayer is highly recommended, but you may also use a paint brush or sponge. You can get a brayer at any crafts store such as Michael's.
Printmaking with Styrofoam Trays- the how to!
  1. Wash and dry your meat trays. You could also use the styrofoam from to-go boxes or even styrofoam plates (if you're determined to spend money ;-)
  2. Cut to desired size and shape.
  3. Draw your design into the styrofoam using a dull pencil or pen. Keep in mind that when you stamp, it will appear as a mirror image, so words should be written accordingly.
  4. Squeeze some paint onto a plate and us a brayer to "ink" the stamp. If you don't have a brayer, you can carefully use a paint brush or a sponge to apply the paint, taking care not to get paint into the groves.
  5. Stamp onto heavy paper or some fabric and apply pressure to every spot of the styrofoam.
  6. Peel up and voila! You've just made a custom stamp!

Here are some details of my food pyramid:


Here are some other children's projects done using the same technique:


I've always had big plans to take my fabric food pyramid and stretch it over a bullitan board. Then I could have a system where every family member could have a designated color of thumbtack and keep track with how many servings of each food group they had eaten that day... but that's never happened. Maybe I could benefit from that more than the kids ;-)

Monday, August 3, 2009

Muffin Tin Monday ~ Tea Party!

The theme for Muffin Tin Monday today is Party/Celebrate, so we had a tea party! It was a huge hit with my daughter. I mean, what little girl doesn't love a tea party?

In the "Tin":

Sugar cubes, a tea bag, an empty tea cup with a spoon, flower shaped toast with strawberry cream cheese, an apricot, banana slices, and a flower shaped turkey and cheese sandwich. Don't forget the teapot!


The sugar cubes were a HUGE hit. Lol! I would have loved to have something fancy like cucumber sandwiches or something, but what can I say? I opted for "easy" ;-)

Needless to say, the Masked Daughter was thrilled!


Here are some other things I've done in the past that I think would be cute for a tea party:


Don't forget to head on over to Michelle's blog to see what others are celebrating today with their party muffin tins! :-)